chicken biryani recipe
chicken biryani recipe

Chicken Biryani Recipe Introduction:
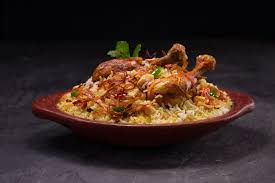
Chicken Biryani is a beloved and aromatic dish that hails from the Indian subcontinent. It’s a one-pot wonder that combines tender chicken, fragrant basmati rice, and a blend of spices into a mouthwatering feast. The dish is known for its layers of flavor and rich aroma, making it a popular choice for festive occasions, family gatherings, and special dinners.
In essence, Chicken Biryani involves marinating chicken pieces in a mixture of yogurt and spices, then layering them with partially cooked rice and cooking everything together until perfectly blended. The result is a dish where the spices permeate both the chicken and the rice, creating a symphony of flavors with every bite.

Chicken Biryani Recipe Ingredients:
For the Chicken Marinade:
- Chicken: 1 lb (450g) chicken, cut into pieces (bone-in or boneless, as preferred)
- Plain Yogurt: 1 cup
- Ginger-Garlic Paste: 2 tablespoons
- Red Chili Powder: 1 tablespoon
- Turmeric Powder: 1 teaspoon
- Garam Masala: 1 teaspoon
- Salt: to taste
For the Rice:
- Basmati Rice: 2 cups
- Water: 4 cups (for cooking rice)
- Cloves: 2-3
- Green Cardamom Pods: 2-3
- Bay Leaf: 1
- Cinnamon Stick: 1
- Salt: to taste
For the Biryani:
- Onions: 2 large, thinly sliced
- Ghee or Vegetable Oil: 2-3 tablespoons
- Tomatoes: 2, chopped
- Cumin Seeds: 1 teaspoon
- Coriander Powder: 1 teaspoon
- Red Chili Powder: 1/2 teaspoon
- Saffron Strands (optional): 1/4 teaspoon
- Milk (for saffron): 1/4 cup
- Fresh Cilantro: a handful, chopped
- Fresh Mint Leaves: a handful, chopped
- Lemon Juice: to taste
For Garnish:
- Fried Onions (optional): 1/2 cup
- Additional Fresh Cilantro and Mint Leaves: for garnish
Chicken Biryani Recipe Ingredient Tips:
- Chicken:
- Bone-In vs. Boneless: Bone-in chicken adds more flavor to the dish, while boneless chicken cooks faster and is easier to eat. Choose based on your preference.
- Quality: Opt for fresh, high-quality chicken for the best flavor and texture.
- Yogurt:
- Full-Fat Yogurt: Use plain, full-fat yogurt for a richer marinade and more tender chicken.
- Consistency: Ensure the yogurt is smooth and not too watery, as it should coat the chicken well.
- Basmati Rice:
- Type: Use aged basmati rice if possible, as it has a better aroma and texture.
- Soaking: Soak the rice for at least 30 minutes before cooking to help it cook evenly and prevent it from becoming mushy.
- Spices:
- Freshness: Use fresh spices for the best flavor. Ground spices lose their potency over time, so it’s better to buy whole spices and grind them as needed.
- Saffron: If using saffron, soak it in warm milk to release its color and flavor. If saffron is too expensive or unavailable, you can skip it or use a pinch of turmeric for color.
- Onions:
- Caramelization: For a deeper flavor, caramelize the onions until they are golden brown. This adds sweetness and richness to the biryani.
- Fried Onions: You can use store-bought fried onions for convenience, but homemade ones add a special touch.
- Tomatoes:
- Ripeness: Use ripe tomatoes for a richer, sweeter taste. If tomatoes are not in season, you can use canned tomatoes.
- Herbs:
- Fresh Cilantro and Mint: Fresh herbs are essential for adding brightness and aroma. Add them both in the marinade and as a garnish.
- Ghee vs. Oil:
- Ghee: Ghee adds a traditional, rich flavor to the biryani. If you prefer a lighter option, you can use vegetable oil or a mix of both.
- Cooking Pot:
- Heavy-Bottomed Pot: Use a heavy-bottomed pot or Dutch oven to ensure even cooking and prevent the biryani from burning. A tight-fitting lid is also crucial for the “dum” (steaming) process.
- Dum Cooking:
- Sealing: Seal the pot with dough or aluminum foil during the dum cooking to trap steam and enhance flavor integration.
Chicken Biryani Recipe Equipment Needed:
- Large Pot or Dutch Oven: For cooking the biryani. A heavy-bottomed pot is best to ensure even cooking and to prevent burning.
- Large Bowl: For marinating the chicken. You’ll need enough space to mix the spices and yogurt with the chicken.
- Colander or Sieve: For draining the rice after rinsing and parboiling.
- Frying Pan or Skillet: For frying onions until they’re golden brown (a key component in biryani for added flavor and texture).
- Measuring Cups and Spoons: For measuring out spices, rice, and liquids accurately.
- Wooden Spoon or Spatula: For stirring the ingredients. A wooden spoon is gentle on cookware and helps in mixing without scratching.
- Knife and Cutting Board: For chopping onions, tomatoes, and other vegetables or herbs.
- Garlic Press or Grinder: For crushing garlic, if not using pre-ground garlic.
- Lid for the Pot: To cover the pot while cooking the biryani to ensure the flavors meld together and the rice cooks evenly.
- Small Bowls: For mixing small amounts of spices and other ingredients.
- Rice Cooker (Optional): For cooking rice separately if you prefer. This can help simplify the process if you’re not using a single-pot method.
- Serving Dish: For presenting the biryani once it’s cooked.
Having these tools ready will help streamline the cooking process and ensure a delicious Chicken Biryani. Enjoy your cooking!
Top of Form
Bottom of Form
Chicken Biryani Recipe Step-by-Step Instructions:
- Marinate the Chicken:
- In a large bowl, combine yogurt, ginger-garlic paste, turmeric powder, red chili powder, garam masala, and salt.
- Add the chicken pieces, ensuring they’re well coated with the marinade.
- Cover and refrigerate for at least 1 hour, preferably overnight for better flavor.
- Prepare the Rice:
- Rinse the basmati rice under cold water until the water runs clear. This removes excess starch and prevents the rice from becoming too sticky.
- In a large pot, bring 4 cups of water to a boil. Add cardamom pods, cloves, bay leaf, cumin seeds, and salt.
- Add the rice and cook until it’s 70% cooked (parboiled). It should still have a slight bite to it. Drain the rice and set aside.
- Cook the Chicken:
- Heat ghee or oil in a large pot or Dutch oven over medium heat.
- Add sliced onions and sauté until golden brown. Remove half for garnishing.
- Add green chilies, ginger-garlic paste, and cook for another minute until fragrant.
- Add chopped tomatoes and cook until they’re soft and oil starts separating.
- Stir in ground coriander, ground cumin, red chili powder, turmeric powder, and salt. Cook for a few minutes.
- Add the marinated chicken and cook until the chicken is fully cooked and the oil starts to separate from the mixture. This usually takes around 15-20 minutes.
- Layer the Biryani:
- Remove the chicken mixture from the pot and set aside.
- In the same pot, spread a layer of the partially cooked rice.
- Sprinkle half of the chopped cilantro and mint leaves over the rice.
- Add the chicken mixture on top of the rice.
- Spread the remaining rice over the chicken. Garnish with the remaining cilantro, mint, and fried onions if using.
- Final Cooking (Dum):
- If using saffron, drizzle the saffron milk over the top layer of rice.
- If using rose water or kewra water, drizzle it over the rice.
- Cover the pot tightly with a lid or aluminum foil to trap the steam.
- Cook on very low heat for about 20-25 minutes. This allows the flavors to meld and the rice to finish cooking.
- Serve:
- Gently fluff the biryani with a fork to mix the layers.
- Serve hot with raita (yogurt sauce) and/or a side salad.
Serving Suggestions:
When serving Chicken Biryani, you can enhance the meal with a variety of sides and accompaniments that complement its rich and complex flavors. Here are some great serving suggestions:
- Raita
- Cucumber Raita: Cooling and refreshing, made with grated cucumber, yogurt, mint, and a touch of cumin powder.
- Onion Raita: A simple mix of sliced onions with yogurt, a bit of salt, and black pepper.
- Boondi Raita: Yogurt with fried chickpea flour balls (boondi) added for extra texture and flavor.
- Pickles
- Mango Pickle: Adds a tangy and spicy kick.
- Lemon Pickle: Offers a sharp contrast to the rich biryani.
- Salads
- Kachumber Salad: A fresh mix of diced tomatoes, cucumbers, onions, and cilantro with a squeeze of lemon juice.
- Carrot and Cabbage Salad: Shredded carrots and cabbage with a light vinaigrette.
- Side Dishes
- Papadam (Poppadum): Crispy, thin wafers that add a delightful crunch.
- Mint Chutney: A fresh and zesty chutney made with mint, coriander, green chilies, and lemon juice.
- Sides for Extra Flavor
- Boiled Eggs: Hard-boiled eggs can be served alongside for extra protein and flavor.
- Plain Yogurt: A simple and cooling side that balances the spiciness.
- Desserts
- Gulab Jamun: Sweet, syrup-soaked dough balls that are a classic Indian dessert.
- Rasmalai: Creamy and fragrant, made with sweetened paneer and flavored with cardamom and saffron.
- Beverages
- Lassi: A yogurt-based drink, either sweet or salty, that helps balance the spices.
- Mint Lemonade: Refreshing and zesty, perfect for a hot day.
These suggestions will complement your Chicken Biryani and create a well-rounded and satisfying meal. Enjoy!
Top of Form
Bottom of Form
FAQs:
- Can I use other types of meat instead of chicken?
- Yes, you can use beef, lamb, or even seafood like prawns in place of chicken. Adjust the cooking times accordingly: beef and lamb may require longer cooking, while seafood generally cooks faster.
- What type of rice is best for biryani?
- Basmati rice is the best choice for biryani due to its long grains and aromatic flavor. It cooks up fluffy and separates well, which is ideal for biryani.
- How do I prevent the rice from being too sticky or mushy?
- Rinse the rice thoroughly before cooking to remove excess starch.
- Parboil the rice (cook it until it’s about 70% done) before layering it with the chicken. This helps prevent overcooking during the final dum process.
- What is “dum cooking” and why is it important?
- Dum cooking is a slow-cooking process where the dish is cooked on low heat with a sealed lid to allow the flavors to meld together. This method ensures that the rice and meat are cooked evenly and absorb all the aromatic spices.
- Can I make biryani ahead of time?
Yes, you can prepare biryani a day in advance. In fact, it often tastes even better the next day as the flavors have more time to develop. Just reheat it gently before serving.


