Red Velvet Cake Recipe
Online Recipes

Red Velvet Cake Recipe

Red Velvet Cake Recipe
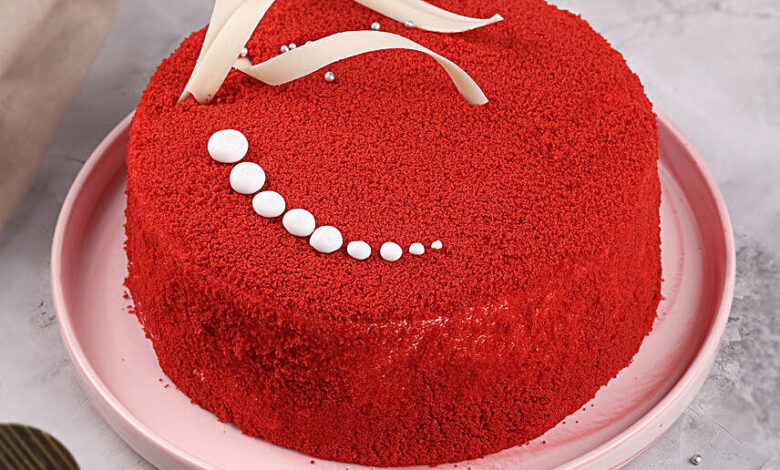
Red Velvet Cake Recipe Introduction:

Red Velvet Cake is a classic American dessert known for its striking red color and velvety texture. Traditionally made with cocoa powder, buttermilk, and a hint of vinegar, this cake boasts a subtle chocolate flavor complemented by a rich cream cheese frosting. The vibrant red hue, often associated with love and celebration, makes it a popular choice for special occasions like birthdays, anniversaries, and holidays.

The origins of Red Velvet Cake can be traced back to the early 20th century, where it became a favorite in Southern cuisine. Today, it continues to captivate dessert lovers with its moist crumb and delightful taste. Whether served at a festive gathering or enjoyed as an everyday treat, this cake is sure to impress with its unique flavor and beautiful presentation. Join us as we dive into the recipe and bring this timeless dessert to life!

red velvet cake

Red Velvet Cake Recipe Overview:

Red Velvet Cake is a classic dessert that stands out for its striking red color and velvety texture. Traditionally made with cocoa powder, buttermilk, and a hint of vinegar, it offers a subtle chocolate flavor that pairs beautifully with its signature cream cheese frosting. The cake’s vibrant hue, often associated with love and celebration, makes it a popular choice for occasions such as birthdays, weddings, and holidays.

This Red Velvet Cake is not only visually stunning with its vibrant color, but it also offers a unique flavor profile that’s both slightly tangy and sweet. Topped with creamy, rich frosting, it’s a delicious dessert that will be a hit at any celebration!

Red Velvet Cake Recipe Ingredients:

  • 2 ½ cups all-purpose flour
  • 1 ½ cups granulated sugar
  • 1 teaspoon baking soda
  • 1 teaspoon salt
  • 1 teaspoon cocoa powder (unsweetened)
  • 1 ½ cups vegetable oil (or canola oil)
  • 1 cup buttermilk (at room temperature)
  • 2 large eggs (at room temperature)
  • 2 tablespoons red food coloring (liquid or gel)
  • 1 teaspoon vanilla extract
  • 1 teaspoon white vinegar

For the Cream Cheese Frosting:

  • 8 oz cream cheese (softened)
  • ½ cup unsalted butter (softened)
  • 4 cups powdered sugar (sifted)
  • 1 teaspoon vanilla extract
  • 1-2 tablespoons milk (optional, for desired consistency)

These ingredients come together to create a rich, moist, and visually stunning Red Velvet Cake that is sure to impress!

Red Velvet Cake Recipe Ingredient Tips:

  • Flour:
  • Sift Before Measuring: Always sift your all-purpose flour before measuring to ensure accurate measurement and avoid a dense cake. This helps achieve a light and fluffy texture.
  • Cocoa Powder:
  • Use Unsweetened: Opt for unsweetened cocoa powder to provide a subtle chocolate flavor without adding extra sweetness. Even a small amount enhances the cake’s depth.
  • Buttermilk:
  • Substitute Option: If you don’t have buttermilk, mix 1 tablespoon of vinegar or lemon juice with 1 cup of milk. Let it sit for about 5 minutes to create a similar tangy effect.
  • Red Food Coloring:
  • Choose Gel Over Liquid: Gel food coloring is more concentrated and provides a richer red color with less liquid, helping maintain the cake’s moisture balance.
  • Vegetable Oil:
  • Neutral Flavor: Use vegetable or canola oil for moisture. Oil-based cakes remain softer and more moist compared to butter, making it perfect for this recipe.
  • Cream Cheese:
  • Soften Properly: Ensure that both the cream cheese and butter are at room temperature for easier mixing. This will help you avoid lumps in your frosting.
  • Powdered Sugar:
  • Sift for Smoothness: Sift the powdered sugar before adding it to the frosting to prevent lumps and achieve a silky smooth texture in your cream cheese frosting.
  • Vinegar:
  • Enhance Color and Texture: Don’t skip the vinegar! It reacts with baking soda to help the cake rise and enhances the vibrant red color without affecting the flavor.
  • Eggs:
  • Room Temperature: Use eggs at room temperature for better incorporation into the batter, which helps create a uniform texture and rise.
  • Flavoring:
  • Add Vanilla Extract: A touch of vanilla extract enhances the overall flavor profile of the cake and complements the other ingredients.
Red Velvet Cake Recipe Equipment Needed:
  • Mixing Bowls:
  • Use medium and large mixing bowls for combining dry and wet ingredients separately.
  • Measuring Cups and Spoons:
  • Accurate measuring tools are essential for getting the correct quantities of ingredients.
  • Electric Mixer:
  • A stand mixer or hand mixer will make it easier to beat the batter and cream the frosting until smooth.
  • Spatula:
  • A silicone or rubber spatula is handy for scraping down the sides of the mixing bowl and folding in ingredients gently.
  • Sifter:
  • A fine-mesh sifter is helpful for sifting flour and cocoa powder, ensuring there are no lumps in your dry ingredients.
  • Cake Pans:
  • Two 9-inch round cake pans are ideal for baking the layers of the Red Velvet Cake. Make sure they are greased and floured to prevent sticking.
  • Cooling Rack:
  • A wire cooling rack is essential for allowing the baked cakes to cool evenly and prevent moisture buildup.
  • Offset Spatula:
  • This tool is useful for spreading cream cheese frosting evenly on the cake layers and for decorating.
  • Parchment Paper:
  • Optional but recommended for lining the bottoms of the cake pans to ensure easy removal of the baked cakes.
  • Knife or Cake Leveler:
  • A serrated knife or cake leveler helps to trim the tops of the cake layers for even stacking and presentation.
  • Turntable (Optional):
  • A cake turntable makes frosting and decorating the cake easier and more precise.
  • Plastic Wrap or Cake Box:
  • For storing any leftover cake or for transporting the finished cake, having a box or wrap is useful.
Red Velvet Cake Recipe Step-by-Step Instructions:

Preparation:

  1. Preheat the Oven:
    • Preheat your oven to 350°F (175°C). Grease and flour two 9-inch round cake pans, or line the bottoms with parchment paper for easier removal.

Making the Cake:

  1. Combine Dry Ingredients:
    • In a medium mixing bowl, sift together 2 ½ cups of all-purpose flour, 1 teaspoon of baking soda, 1 teaspoon of salt, and 1 teaspoon of unsweetened cocoa powder. Set aside.
  1. Mix Wet Ingredients:
    • In a large mixing bowl, whisk together 1 ½ cups of vegetable oil, 1 cup of buttermilk (at room temperature), 2 large eggs (at room temperature), 2 tablespoons of red food coloring, 1 teaspoon of vanilla extract, and 1 teaspoon of white vinegar until well combined.
  1. Combine Mixtures:
    • Gradually add the dry ingredients to the wet ingredients. Mix on low speed until just combined, being careful not to overmix. The batter should be smooth and slightly thick.
  1. Pour Batter into Pans:
    • Divide the batter evenly between the prepared cake pans. Smooth the tops with a spatula.
  1. Bake:
    • Bake in the preheated oven for 30-35 minutes, or until a toothpick inserted into the center comes out clean. Keep an eye on them to avoid overbaking.
  1. Cool the Cakes:
    • Once baked, remove the cakes from the oven and let them cool in the pans for about 10 minutes. Then, carefully transfer them to a wire cooling rack to cool completely.

Making the Cream Cheese Frosting:

  1. Prepare the Frosting:
    • In a mixing bowl, beat 8 oz of softened cream cheese and ½ cup of softened unsalted butter together until creamy and smooth.
  1. Add Sugar and Vanilla:
    • Gradually add 4 cups of sifted powdered sugar and 1 teaspoon of vanilla extract. Mix until combined and smooth. If the frosting is too thick, add 1-2 tablespoons of milk to reach your desired consistency.

Assembling the Cake:

  1. Level the Cakes (Optional):
    • If the cake layers have domed on top, use a serrated knife or cake leveler to trim them flat for even stacking.
  1. Frost the First Layer:
    • Place one cake layer on a serving plate or cake stand. Spread a generous layer of cream cheese frosting on top.
  1. Add the Second Layer:
    • Carefully place the second cake layer on top of the frosted first layer.
  1. Frost the Top and Sides:
    • Use the offset spatula to spread frosting over the top and sides of the cake. Smooth it out as desired for a polished finish.
  1. Decorate (Optional):
    • If desired, decorate with additional toppings, such as sprinkles, chopped nuts, or extra cream cheese frosting.

Serving:

  1. Slice and Serve:
    • Slice the cake into generous pieces and enjoy! For the best flavor, serve at room temperature.

Storing:

  1. Store Leftovers:
    • Store any leftover cake in an airtight container at room temperature for up to 2 days, or refrigerate for longer freshness.
Red Velvet Cake Recipe Tips and Tricks:
  • Room Temperature Ingredients:
  • Ensure that your eggs and buttermilk are at room temperature before mixing. This helps create a smoother batter and improves the cake’s texture.
  • Don’t Overmix:
  • When combining wet and dry ingredients, mix until just combined. Overmixing can lead to a dense cake, so be gentle to maintain that light, fluffy texture.
  • Check Oven Temperature:
  • Use an oven thermometer to ensure your oven is at the correct temperature. Baking at the right temperature is crucial for even rising and texture.
  • Use Quality Food Coloring:
  • Invest in a high-quality red food coloring for the best color payoff. Gel coloring is preferable as it gives a vibrant hue without altering the batter’s consistency.
  • Chill the Frosting:
  • If your cream cheese frosting is too soft, chill it for about 15-20 minutes before frosting the cake. This will help it hold its shape better when applied.
  • Layering:
  • For a more dramatic presentation, consider making a three-layer cake instead of two by splitting the batter into three pans. This allows for more frosting and a beautiful look.
  • Moisture Maintenance:
  • To keep the cake moist, consider brushing the layers with a simple syrup (made from equal parts sugar and water) before frosting.
  • Flavor Enhancements:
  • Experiment with adding a teaspoon of almond extract to the batter for a subtle, delightful flavor that complements the cocoa.
  • Decorating Techniques:
  • Use a cake turntable for easier frosting and decorating. This allows you to rotate the cake while applying frosting for a smoother finish.
  • Storage Tips:
  • If you plan to make the cake ahead of time, bake the layers, cool them completely, wrap them tightly in plastic wrap, and freeze. Thaw and frost when ready to serve.
  • Serving Temperature:
  • For the best flavor and texture, serve the cake at room temperature. If refrigerated, let it sit out for about 30 minutes before serving.
  • Garnishing:
  • Add visual appeal by garnishing with chocolate shavings, chopped nuts, or red velvet crumbs for a festive touch.

Serving Suggestions:

  • Classic Slice:
  • Serve a traditional slice of Red Velvet Cake with a generous dollop of cream cheese frosting on top. Pair it with a cup of coffee or tea for a delightful treat.
  • Layered Dessert:
  • Create individual desserts by cutting the cake into small squares and layering them in dessert cups with cream cheese frosting and fresh berries.
  • Ice Cream Pairing:
  • Serve a slice of warm Red Velvet Cake with a scoop of vanilla ice cream or cream cheese ice cream. The cold creaminess complements the rich cake perfectly.
  • Fruit Garnish:
  • Top slices of cake with fresh raspberries or strawberries for a refreshing contrast to the sweet cake. The bright colors also enhance the presentation.
  • Chocolate Drizzle:
  • Drizzle melted chocolate or chocolate ganache over the frosted cake for an added layer of richness and visual appeal.
  • Mini Cakes:
  • Bake the cake in mini pans to create individual Red Velvet cakes. Frost and serve with a sprinkle of crushed nuts or chocolate shavings for a charming presentation.
  • Breakfast Treat:
  • Serve leftover slices as a special breakfast or brunch option, accompanied by a side of yogurt or cottage cheese for a protein boost.
  • Celebration Cake:
  • For special occasions, decorate the cake with festive sprinkles, edible glitter, or themed decorations that match the celebration (e.g., hearts for Valentine’s Day).
  • Cheesecake Hybrid:
  • For an indulgent twist, use Red Velvet Cake layers in a layered cheesecake dessert. Alternate layers of cheesecake filling and cake for a rich, creamy treat.
  • Takeaway Treats:
  • Slice the cake into small portions, place them in decorative boxes, and give them as gifts or party favors for guests to enjoy at home.

FAQs:

  1. What gives Red Velvet Cake its red color?
  • The red color of Red Velvet Cake primarily comes from red food coloring. Historically, cocoa powder had a reddish hue that contributed to the color, but modern recipes rely on food coloring for a vibrant appearance.
  1. Can I use less food coloring?
  • Yes, you can adjust the amount of food coloring to your preference, but this may result in a lighter cake. For the signature look, use the recommended amount or try a gel food coloring for more intensity.
  1. What is the best way to store leftover Red Velvet Cake?
  • Store leftover cake in an airtight container at room temperature for up to 2 days. For longer storage, refrigerate it, where it will stay fresh for about a week. You can also freeze slices wrapped tightly in plastic wrap and foil for up to 3 months.
  1. Can I make Red Velvet Cake ahead of time?
  • Yes! You can bake the cake layers a day or two in advance. Allow them to cool completely, wrap them tightly, and store them at room temperature or in the fridge. Frost just before serving for the best texture.
  1. Is there a gluten-free version of Red Velvet Cake?
  • Yes, you can substitute all-purpose flour with a gluten-free flour blend. Make sure to use a blend that includes xanthan gum or add it separately to help with texture.

Related Articles

Back to top button