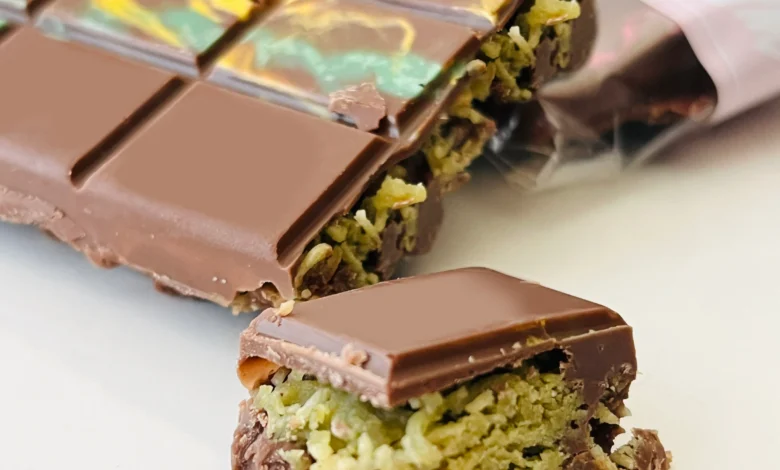
Kunafa Chocolate Recipe
Kunafa Chocolate Recipe

Kunafa Chocolate Recipe Introduction:
Kunafa, a beloved Middle Eastern dessert, is traditionally made with thin noodle-like pastry soaked in syrup and layered with cheese or cream. However, this recipe adds a delightful twist by incorporating chocolate, making it a favorite for chocolate lovers. The crispy, golden layers of kunafa are combined with rich, melted chocolate, creating a decadent treat that balances sweetness with a hint of bitterness from the cocoa.
Whether you’re celebrating a special occasion, hosting a dinner party, or simply indulging in a sweet treat, Kunafa Chocolate is sure to impress. Its unique flavor profile and stunning presentation make it a standout dessert that combines tradition with modern flair. Let’s dive into this delicious fusion that brings the best of both worlds to your table!

Kunafa Chocolate: A Perfect Fusion of Traditional Delight and Decadent Cocoa
Kunafa, a beloved Middle Eastern dessert, is renowned for its sweet, crunchy layers of dough filled with gooey cheese or custard. This classic dish has stood the test of time, delighting taste buds across generations. But what happens when you take this iconic dessert and infuse it with the rich, indulgent taste of chocolate? You get Kunafa Chocolate, a delectable fusion that combines the best of both worlds.
In this blog post, we’ll take you step by step through the process of making Kunafa Chocolate at home. Whether you’re a seasoned dessert maker or a curious beginner, this recipe will guide you through creating a masterpiece that’s sure to impress. So, grab your ingredients, and let’s dive into this sweet journey!
What is Kunafa?
Kunafa (or Knafeh) is a traditional dessert that originates from the Levant region but is popular across the Middle East and North Africa. The dessert is typically made from fine semolina dough (also known as kataifi dough), which is layered and baked with sweet syrups and fillings. It is often paired with either soft cheese, such as Nabulsi or Akkawi, or custard-like cream fillings.
Kunafa is then baked to perfection until the top becomes golden brown and crispy. It is then drenched in rose water syrup or orange blossom syrup to bring out its rich flavor. The dessert is usually served warm and is a go-to treat for special occasions like Ramadan, weddings, and holidays.
Now, imagine replacing the traditional filling with luscious chocolate – a dessert lover’s dream. This is where Kunafa Chocolate enters the scene, taking everything you love about the classic dish and making it even more irresistible.
Ingredients for Kunafa Chocolate
For the Kunafa Base:
500g Kataifi dough (shredded phyllo dough, available at Middle Eastern grocery stores)
200g unsalted butter (melted)
1/2 cup sugar (optional, for sweetness)
For the Chocolate Filling:
200g dark chocolate (preferably 60-70% cocoa for a rich flavor)
200ml heavy cream
1/4 cup milk (for a creamy consistency)
1/2 teaspoon vanilla extract (optional, for added depth of flavor)
For the Topping:
1/2 cup crushed pistachios (or any nuts of your choice, for added crunch and color)
1/4 cup melted white chocolate (for drizzling, optional)
For the Sugar Syrup:
1 cup water
1 cup sugar
1 teaspoon lemon juice
1 tablespoon rose water or orange blossom water (for an aromatic touch)
How to Make Kunafa Chocolate
Step 1: Prepare the Sugar Syrup
Start by making the syrup that will soak into the warm kunafa once it’s baked. This is a crucial element that brings the dessert together.
Combine the water and sugar in a saucepan over medium heat.
Stir occasionally until the sugar dissolves completely.
Add the lemon juice and bring the syrup to a simmer for about 10-15 minutes. You want the syrup to thicken slightly.
Add the rose water or orange blossom water and remove the syrup from the heat. Set it aside to cool.
Step 2: Prepare the Chocolate Filling
While the syrup is cooling, it’s time to prepare the decadent chocolate filling.
Chop the dark chocolate into small pieces so that it melts easily.
In a saucepan, heat the heavy cream and milk over medium heat, stirring occasionally until it begins to simmer. Do not let it come to a boil.
Pour the hot cream and milk mixture over the chopped chocolate and let it sit for a minute to melt.
Stir until the chocolate is completely melted and the mixture becomes smooth and glossy. Add the vanilla extract if desired for a deeper flavor.
Let the chocolate filling cool slightly before using it to fill the kunafa.
Step 3: Assemble the Kunafa Chocolate
Now comes the fun part: assembling and baking your Kunafa Chocolate!
Preheat your oven to 180°C (350°F).
Take the kataifi dough and separate it into small strands. You can do this by gently pulling apart the dough with your fingers.
Place the dough into a large bowl and pour the melted butter (and sugar, if using) over it. Toss the dough so that every strand is coated in butter. This will give the kunafa its signature crispiness.
Grease a 9-inch round baking dish with butter. Now, press half of the buttered kataifi dough into the bottom of the dish to form a base layer.
Spread a layer of the prepared chocolate filling evenly over the dough, making sure it covers the entire surface.
Top with the remaining kataifi dough, pressing it gently into the chocolate layer.
Bake the kunafa in the preheated oven for about 30-40 minutes, or until the top is golden brown and crispy.
Step 4: Serve and Garnish
Once your Kunafa Chocolate is out of the oven and golden brown, it’s time to drizzle that sweet sugar syrup over the hot dessert.
Pour the cooled sugar syrup generously over the warm kunafa, allowing it to soak in. You’ll hear a satisfying sizzle as it hits the hot dough.
Garnish with crushed pistachios or your favorite nuts for texture and color. If you like, drizzle a little melted white chocolate over the top for an extra touch of elegance.
Step 5: Enjoy!
Let the Kunafa Chocolate cool for about 10 minutes before slicing. This dessert is best served warm, where the chocolate filling remains gooey and delicious. Serve it alongside a cup of Turkish coffee or a refreshing mint tea for the perfect indulgent treat.
Why You’ll Love Kunafa Chocolate
This Kunafa Chocolate recipe brings together the best of two worlds – the crispy, buttery goodness of traditional kunafa dough and the indulgent richness of chocolate. The contrast of textures between the crispy outer layer and the smooth, melty chocolate filling is simply divine.
What makes it even better is how easy it is to make this dessert at home. You don’t need to be a pro baker to achieve that perfect golden brown color and gooey chocolate center. Plus, you can customize the sweetness level and even experiment with different types of chocolate, from milk to white, or add a hint of espresso for a mocha twist.
Whether you’re celebrating a special occasion or just craving something sweet, Kunafa Chocolate is sure to be a crowd-pleaser. Its irresistible combination of flavors and textures will make it a hit at any gathering.
Conclusion
Kunafa Chocolate is a luxurious and delicious twist on a Middle Eastern classic that will leave everyone asking for more. The fusion of crispy kunafa dough and rich, velvety chocolate creates a dessert that’s impossible to resist. Whether you serve it during the holidays, at a family gathering, or as a simple indulgence, this dessert is guaranteed to be the star of the show.
So, roll up your sleeves, gather your ingredients, and treat yourself (and your loved ones) to a slice of this mouthwatering delight. Trust us, Kunafa Chocolate is the ultimate indulgence you deserve!


